Tutorial on Trimming Wings
The first time you have your bird’s wings trimmed it should be done by a professional who can show you exactly what to do. It is NOT recommended that you do this without an in-person demonstration the first time. It is also NOT recommended that you attempt this on larger parrots. This wing trim is easy to do on budgies, lovebirds, and cockatiels, but larger parrots generally require two people, one to hold the bird, one to trim.
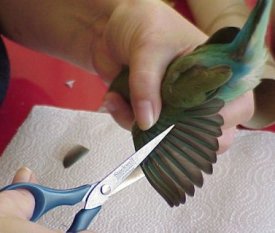
With smaller birds such as lovebirds, you can hold the bird in one hand while trimming with the other.
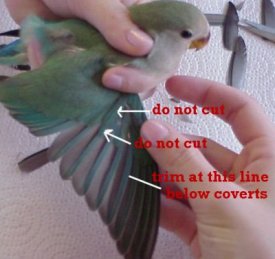
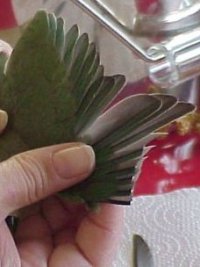
You only want to trim the first five to six primary flight feathers at first. Never cut so high up on these long feathers that you cut into the small feathers that lay over the top of them. If you look closely at the picture to the right, you will see there are two layers of short feathers that lay on top of the longer flight feathers. DO NOT CUT those short feathers. You should trim about a quarter inch below them, only cutting the primaries. Follow the angle of the upper, overlaying feathers so that the trimmed wings will rest nicely against the body and not irritate the bird by poking into his or her skin.
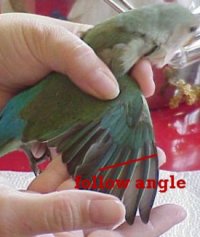
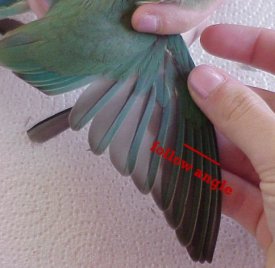
These pictures illustrate how you want to cut along the single layer of long flight feathers, a few centimeters below the top layers of short feathers. Remember to follow the natural angle of the wings so the cut feathers rest nicely against the body and don’t poke into the bird’s skin.
These two shots show how you cut along the primary flight feathers at an angle. You should only cut five (5) feathers at first, then see how far your bird can fly. If it gently coasts to the ground but does not get lift, that’s perfect. You don’t want your bird to have no ability to fly, just not to get “lift.” This type of modified wing trim is the best for birds such as African Greys, who are often overtrimmed and end up splitting their keel when they land too hard on the floor.
There should be absolutely no bleeding. If you make the bird bleed, you are cutting much too high!!! This should be a totally painless procedure (although the bird will not like being held in such a constricted manner, it only lasts a few seconds).
Avoid cutting too many flight feathers. You want it to be able to coast gently to the ground and not land with a thud. Overtrimming the wings is too limiting for the bird’s activity. However, the type of trim I advocate needs to be maintained regularly since it will grow out very quickly and the bird will be able to get lift sometimes in as few as 4 weeks.
The trimmed feathers look like this (above).
Remember, that for young birds such as the ones in this picture (9 weeks old), these flight feathers will grow back in very quickly, so keep track of how your bird is flying and if it is getting “lift”. If the bird can get “lift” (going up, rather than coasting down to land), it can get quite a distance outside, especially if there is a wind.
Also note: THERE SHOULD NEVER be any bleeding. You have done something wrong if the bird bleeds. This is a painless process when done right (although the bird won’t like being held this way for the brief moment while cutting). Household flour is a good emergency product for stopping bleeding.
Again, we STRONGLY recommend you be taught how to do this in person the first time, then use this guide just to refresh your memory.

